In my continuing effort to rid the OpenStack storage world of Ceph, I am going to be looking at how to configure OpenStack Glance to use S3 as a backing store, as this is one of the current use cases for Ceph.
In a previous post I looked at using Cinder as a backing store, but in this post I will use an S3 store for my images and also implement the Cinder Image-Volume cache, to alleviate the performance issues that can come with having images stored on an S3 backend, whether they be caused by shear size of the images or network issues between the S3 store and the OpenStack hypervisors requiring the images.
There are plenty of S3-compliant object stores out there, but here I will be using a Pure Storage FlashBlade.
FlashBlade Setup
The S3 configuration for Glance requires information on what the backing store is and how it is configured, so first we must set up the FlashBlade with an appropriate Object Store Account, User and associated access keys.
Once we log onto the FlashBlade’s GUI we navigate to Storage > Object Store and then select the + symbol in the top right of the Accounts pane.
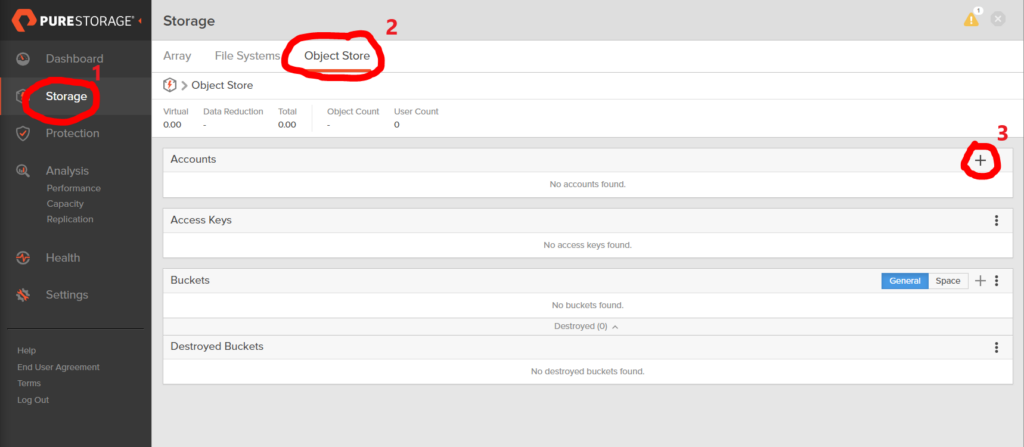
This creates a pop-up where we provide the new S3 account name.

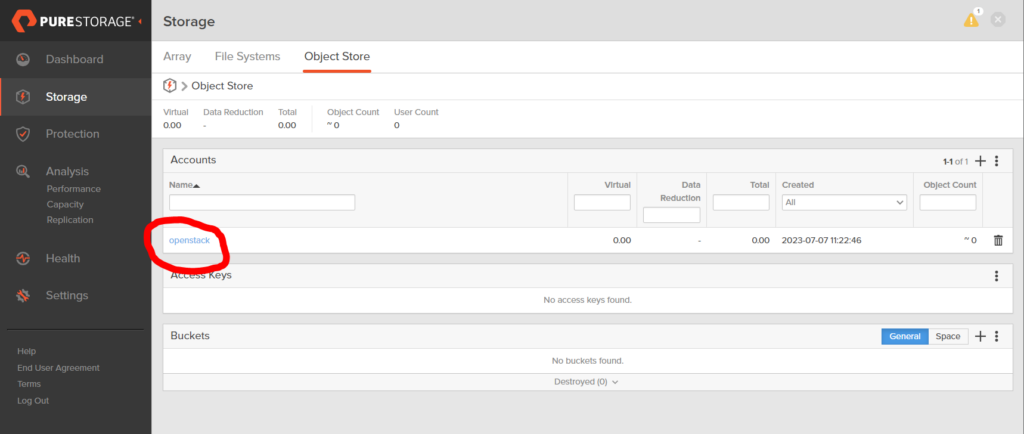
Once the account has been created, I used openstack, we select the new account from the Accounts pane
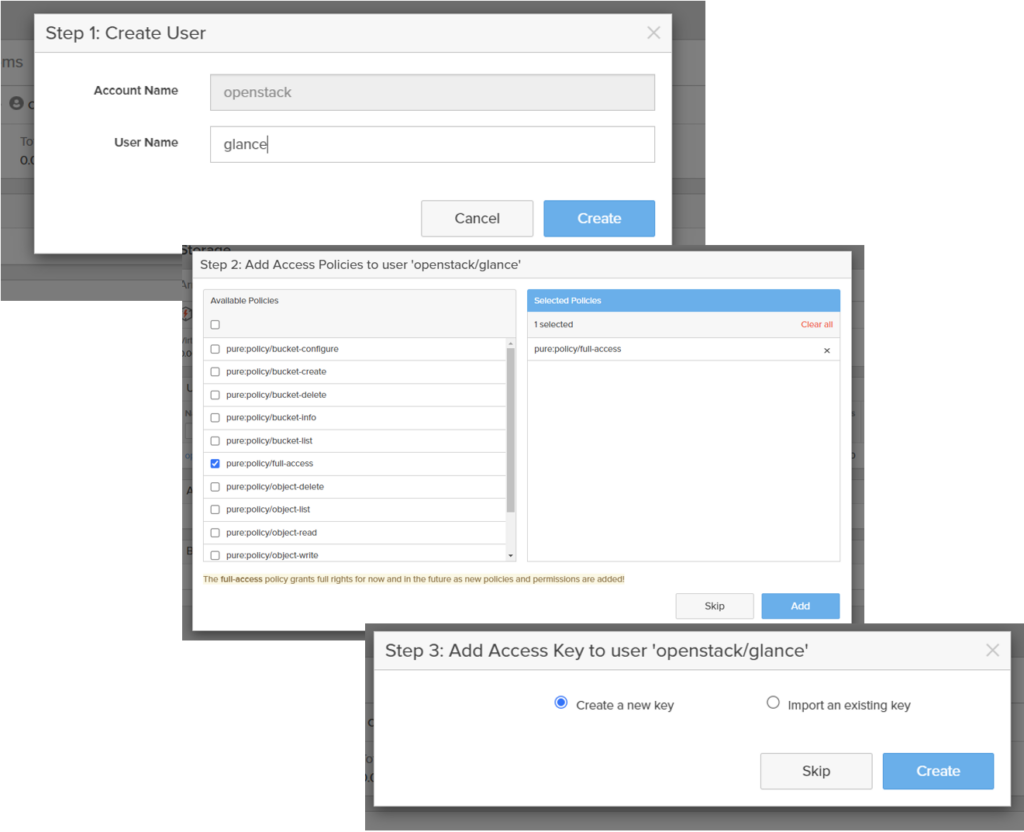
Now we create a User within the Account by using the + symbol in the top right of the Users pane. This is a three-step procedure, the first being defining the user name, I’m going to use glance, then the Access Policies need to be defined and finally, you are given the option to create a new access key or import an existing key.
For simplicity, I’m just going to give the User full access rights and allow the FlashBlade to create a new key for me.
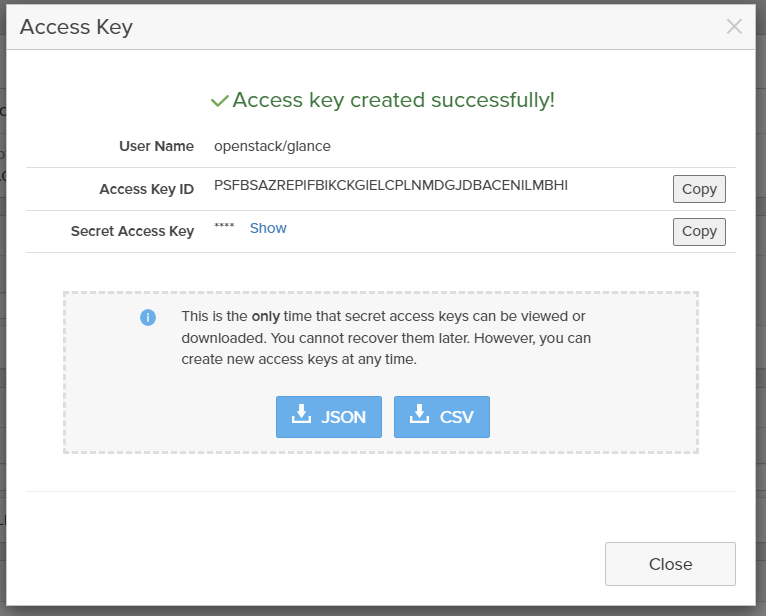
On completing these three steps, you are presented with your Access Key ID and Secret Access Key (which you can expose).
NOTE: Make sure to record these keys or download them (as offered) as it is the only time you will see the secret access key. It cannot be recovered later from the FlashBlade.
Optionally, you could create a bucket in your account that Glance will use, but I like to let Glance create the bucket on the first push and I’ll configure Glance to do that later.
Your FlashBlade setup is now complete and you can move on to configuring OpenStack Glance to use your FlashBlade as an S3 backing store.
Configuring Glance
At this point, I’m going to assume you have an OpenStack environment up and running. I’m using a simple Devstack deployment with all the default settings.
The only thing we need to modify to get the S3 backing store working is the Glance API configuration file, /etc/glance/glance-api.conf.
In the [DEFAULT] stanza we just need to add the FlashBlade S3 backend as an enabled_backend, add a stanza for the backend and update the [glance_store] stanza to let it know we have a S3 backend.
[DEFAULT]
...
enabled_backends = flashblade:s3

[glance_store]
filesystem_store_datadir = /opt/stack/data/glance/images/
stores = s3, file
default_store = s3
default_backend = flashblade

[flashblade]
s3_store_host = http://<IP address of the FB data VIP>
s3_store_access_key = <access key>
s3_store_secret_key = <secret key>
s3_store_create_bucket_on_put = True   <== Only if you didn't create a bucket
s3_store_bucket = <bucket name>
Now you just need to restart the glance-api service
$ sudo systemctl restart devstack@g-apiand check that your store has been correctly created by Glance.
$ glance stores-info
+----------+-------------------------------------------+
| Property | Value                                     |
+----------+-------------------------------------------+
| stores   | [{"id": "flashblade", "default": "true"}] |
+----------+-------------------------------------------+
Configuring Cinder
As I mentioned earlier, I am also going to use the Cinder Image-Volume cache to help alleviate potential performance issues by creating multiple instances from the same image stored on an S3 backend.
It isn’t that the FlashBlade, or any other S3 backend, is not performant (in fact the FlashBlade is one of the fastest object stores there is), it is to do with the way OpenStack spins up instances from images as boot volumes.
There is a lot of re-copying of images over the network each time an image is requested to boot an instance. With very large images this can take time, and also, with boot from volume requests, there is a requirement for multiple disk mounts and unmounts to occur before Nova can start to boot its instance.
The Cinder Image-Volume cache creates a local copy of the Glance image on a Cinder backend and then uses this as a gold copy to be the source for cloning boot volumes. This significantly reduces instance instantiation times and also, due to data reduction technology, can significantly reduce the amount of physical storage used by multiple Nova instances booting from the same image on the same Cinder backend.
Enabling the image cache for a cinder backend is very simple. All you need to do is add the following line to the stanza of each backend you want to have cache enabled in the Cinder configuration file /etc/cinder/cinder.conf.
image_volume_cache_enabled = TrueBy default, this will allow unlimited cached images on the backend and no limit to the size of the cache. If you want to add some controls the following options are available.
image_volume_cache_max_size_gb = <cache size in GB>
image_volume_cache_max_count = <max image count>
After changing the cinder configuration file, you must restart the cinder-volume service.
$ sudo systemctl restart devstack@c-volIf you use the cache limiting parameters, when you hit a limit (whichever comes first) the oldest image is evacuated to make way for the new image.
Also, if the master image on the main Glance store is updated, the image in the cache will be updated the next time it is used.
If you want to enable the same image-volume cache settings for all Cinder backends then put the appropriate parameters in the [DEFAULT] stanza instead and all backends will use these settings.
Populating the Glance Store
For simplicity, I’m only going to create one image for use in OpenStack and store it in the S3 glance store. First I’ll get the base Ubunto 22.04 image from the “interweb” and convert it to RAW format, before uploading it to the Glance store.
$ wget https://cloud-images.ubuntu.com/jammy/current/jammy-server-cloudimg-amd64.img
$ qemu-img convert -O raw jammy-server-cloudimg-amd64.img jammy-server-cloudimg-amd64.raw
$ openstack image create --public --container-format bare --disk-format raw --file ./jammy-server-cloudimg-amd64.raw --unprotected "Ubuntu 22.04"
The final command pushes the image to the FlashBlade account and user we created and puts it in a bucket. Remember that I didn’t create the bucket in the initial setup of the FlashBlade account, but left Glance to do that with the s3_store_create_bucket_on_put = True parameter.
If we look at the image from an OpenStack perspective using openstack image show there is no indication of where the image is being stored, but if we look at the FlashBlade we will see that there is now a bucket that has been created and that it has one object.

It is interesting to see that although the actual image size for Ubuntu 22.04 image is 2.2G, the FlashBlade has used its data reduction technology to reduce the size of the image stored to only 803.07M (at the time of the screenshot – this may reduce in size over time as the FlashBlade performs more magic on the object).
If you did want to see from Glance that the image was stored on the S3 backed you would need to enable the parameter show_multiple_locations = True in the Glance API configuration file. A warning with this though!! By setting this parameter to true, you will see the location of the image, but in the case of an S3 backed this will also expose the Access Key ID and, much worse, the Secret Access Key. This is a major security risk and has been acknowledged by the Glance community.
Whilst they work out how to resolve this issue, the recommendation is not to use the show_multiple_locations parameter.
Exercising the Cinder Image-Volume cache
So we have our image in Glance, on the S3 store. Now we want to use the image to create a bootable volume on one of our Cinder backends.
To create a bootable volume from the image in the S3 store, we need to issue the following command. Notice that I am specifying a specific volume-type for the new volume. This defines which Cinder backend the volume will be created on.
I’m doing this with time so that we can see how long the initial volume creation takes.
$ time openstack volume create --size 3 --type pure --bootable --image afcde4f5-9a09-4f6d-9be6-df6c631b9b79 new_volume
+---------------------+--------------------------------------+
| Field               | Value                                |
+---------------------+--------------------------------------+
| attachments         | []                                   |
| availability_zone   | nova                                 |
| bootable            | false                                |
| cluster_name        | None                                 |
| consistencygroup_id | None                                 |
| created_at          | 2023-07-07T17:09:24.007988           |
| description         | None                                 |
| encrypted           | False                                |
| group_id            | None                                 |
| id                  | 8d20682d-468d-4eab-a0b2-57b12113cbcd |
| migration_status    | None                                 |
| multiattach         | False                                |
| name                | new_volume                           |
| properties          |                                      |
| provider_id         | None                                 |
| replication_status  | None                                 |
| service_uuid        | None                                 |
| shared_targets      | True                                 |
| size                | 3                                    |
| snapshot_id         | None                                 |
| source_volid        | None                                 |
| status              | creating                             |
| type                | pure                                 |
| updated_at          | None                                 |
| user_id             | 3e8dc7385e98434b93264bfef00d90a1     |
+---------------------+--------------------------------------+

real    1m17.781s
user    0m2.280s
sys     0m0.393s
Once this has been created (it took 1m18s) we can see the volume through the CLI:
$ openstack volume list
+--------------------------------------+------------+-----------+------+-------------+
| ID                                   | Name       | Status    | Size | Attached to |
+--------------------------------------+------------+-----------+------+-------------+
| 8d20682d-468d-4eab-a0b2-57b12113cbcd | new_volume | available |    3 |             |
+--------------------------------------+------------+-----------+------+-------------+
but if we are an administrator we can also request to see volumes owned by other tenants
$ openstack volume list --all
+--------------------------------------+--------------------------------------------+-----------+------+-------------+
| ID                                   | Name                                       | Status    | Size | Attached to |
+--------------------------------------+--------------------------------------------+-----------+------+-------------+
| 8d20682d-468d-4eab-a0b2-57b12113cbcd | new_volume                                 | available |    3 |             |
| 1fbe04ab-7a18-47bf-afec-1cd0ef1bf449 | image-afcde4f5-9a09-4f6d-9be6-df6c631b9b79 | available |    3 |             |
+--------------------------------------+--------------------------------------------+-----------+------+-------------+
We can see there are two volumes, one that the tenant who created the volume can see and one that is owned by another tenant. In this case the Cinder Internal Tenant and this is the gold copy of the image that will be used for future cloning.
If I now create another bootable volume (with time again) from the same image then it creates almost instantly:
$ time openstack volume create --size 3 --type pure --bootable --image afcde4f5-9a09-4f6d-9be6-df6c631b9b79 new_volume2
+---------------------+--------------------------------------+
| Field               | Value                                |
+---------------------+--------------------------------------+
| attachments         | []                                   |
| availability_zone   | nova                                 |
| bootable            | false                                |
| cluster_name        | None                                 |
| consistencygroup_id | None                                 |
| created_at          | 2023-07-07T17:11:06.100676           |
| description         | None                                 |
| encrypted           | False                                |
| group_id            | None                                 |
| id                  | 2b0bbd8f-5f10-40f4-bc59-06ba54b92aaa |
| migration_status    | None                                 |
| multiattach         | False                                |
| name                | new_volume2                          |
| properties          |                                      |
| provider_id         | None                                 |
| replication_status  | None                                 |
| service_uuid        | None                                 |
| shared_targets      | True                                 |
| size                | 3                                    |
| snapshot_id         | None                                 |
| source_volid        | None                                 |
| status              | creating                             |
| type                | pure                                 |
| updated_at          | None                                 |
| user_id             | 3e8dc7385e98434b93264bfef00d90a1     |
+---------------------+--------------------------------------+

real    0m3.919s
user    0m1.825s
sys     0m0.328s
Now the creation is only taking 4 seconds!!
Pretty good improvement. All enabled by the underlying Cinder backend doing a clone of the gold image volume that was initially created, instead of performing a remote copy of the image from the Glance store on S3.
Conclusion
To me, I think there are a few takeaways from this.
- It’s pretty easy to configure Glance stores to use an S3 backend, instead of something as complex as Ceph.
- FlashBlade is a good platform for reducing the size of images in S3 stores, thereby allowing you to get better use of your FlashBlade’s capacity.
- Cinder Image-Volume cache is also easy to configure and can considerably reduce your Nova instance instantiation time.
- Backend cloning capabilities, on backends such as the Pure Storage FlashArray, can significantly leverage data reduction technologies to ensure your gold images and their clones are using as little physical space as possible.
One more nail in the coffin of Ceph??